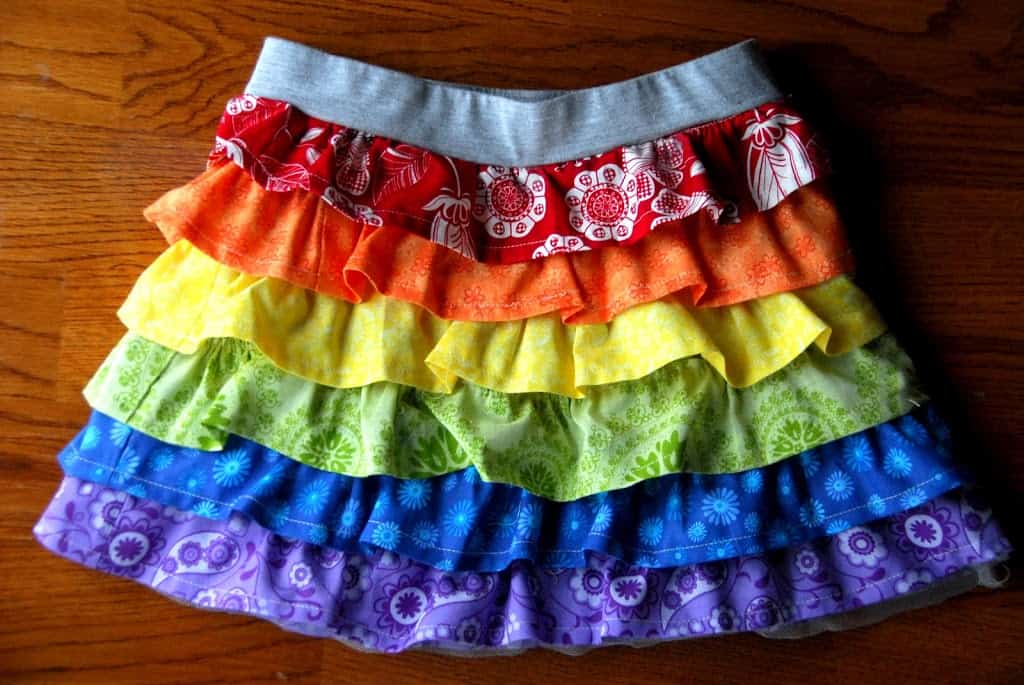
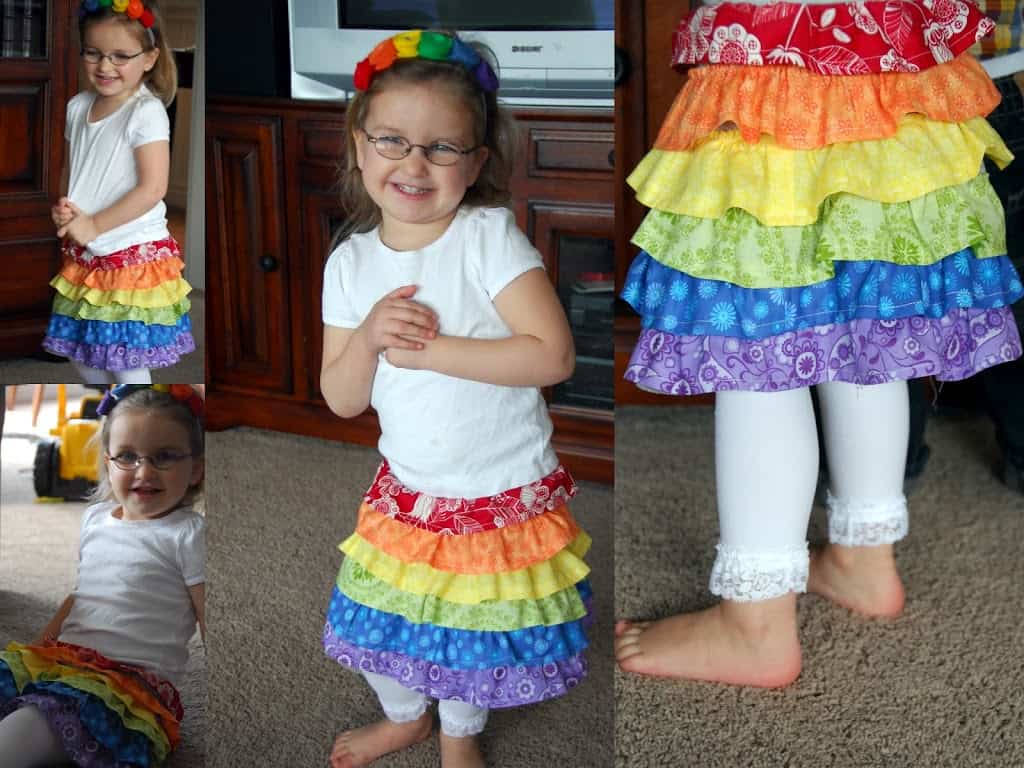
 I made this rainbow ruffle skirt for Kenzie’s upcoming rainbow birthday party. To those real sewers out there, this tutorial is probably the most ridiculous thing you have ever seen. I, on the other hand, don’t really sew. I try and fake through it when I have an idea. I’ve never taken a sewing class, and I didn’t grow up around sewing. So, the way I fumble through this project is probably really weird. That said, I am so excited about the outcome, so I had to pass it along as a tutorial. Perhaps you are like me and have no idea how to follow a pattern. Maybe you think, like I do, that because you watch “Project Runway” you are perfectly qualified to try your hand at creating something on your sewing machine. I have tried to do all activities on this blog with my kids. Because I’m not a sewer, this was definitely a nap time activity for me. All that said, let’s get to it.
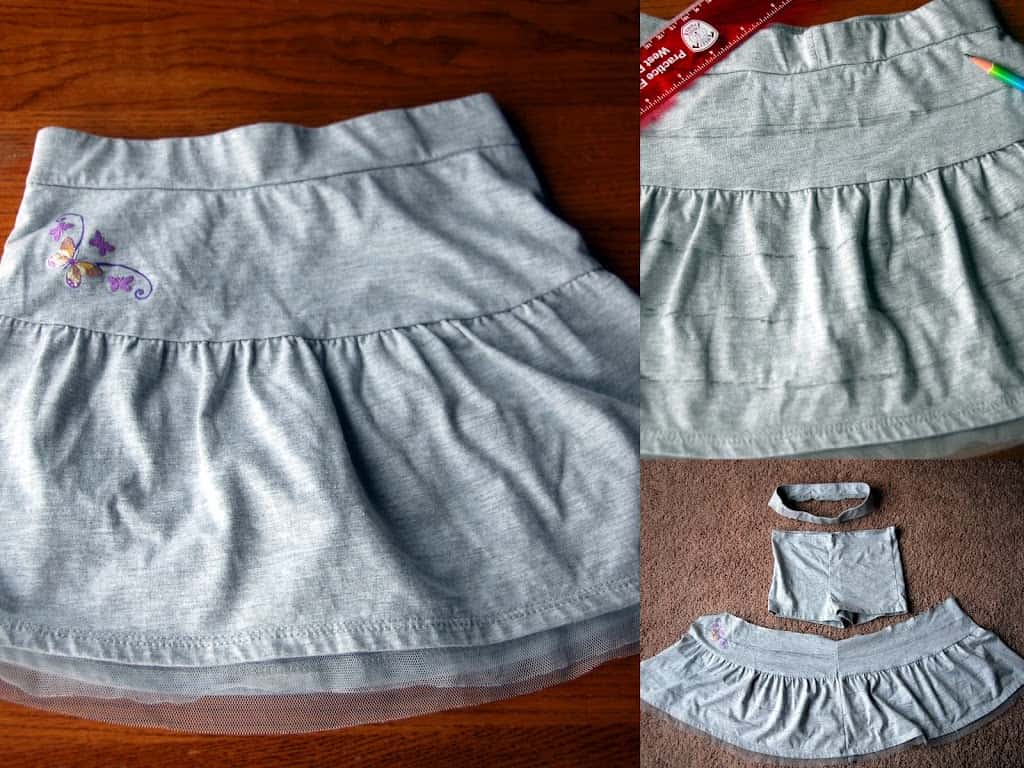 First, I bought a little jersey shirt at a second hand store. The skirt was nine inches in length, and I wanted six tiers, so I drew lines on the skirt 1.5 inches apart. This would be where I wanted to sew the top of each tier. I drew these lines on the front and back with a pencil. Then, I deconstructed the skirt.
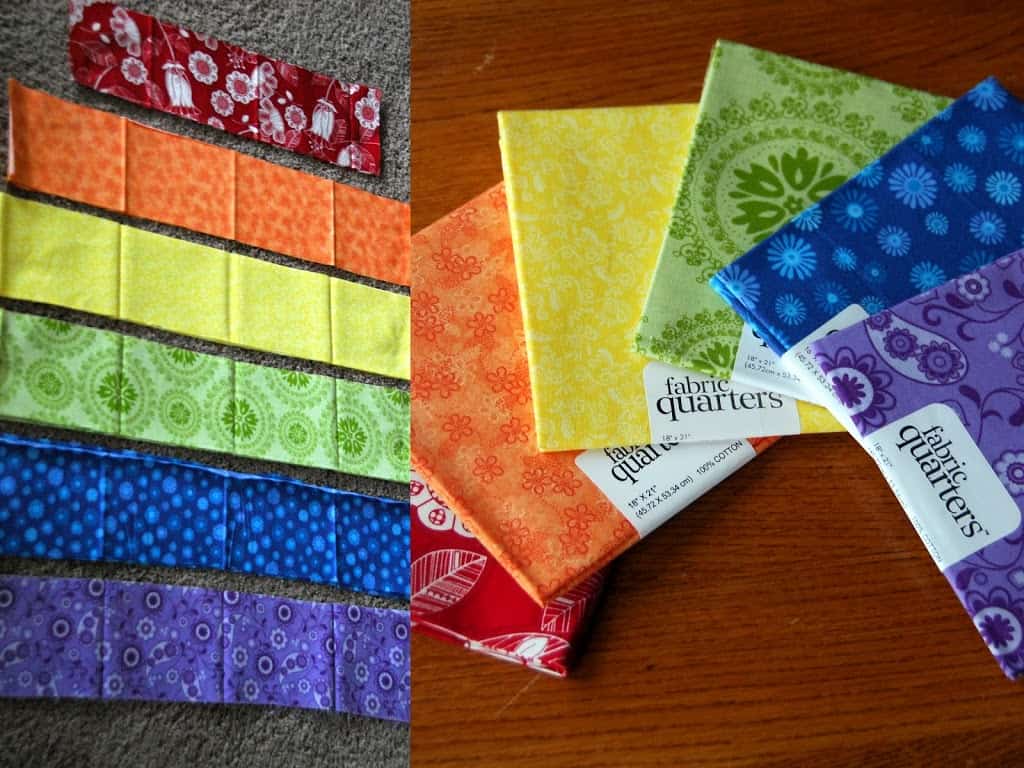
 Because the fabric was not long enough, I first had to sew two pieces together to determine the total length (again 1.5x to 2.0x the length of the skirt). Next I folded over the sides of the strips to give me a 2.25 inch tier (so it was 2.25 + the seam allowance on both sides when I originally cut). I chose that because you’ll remember that my spacing was 1.5 inches apart, and I wanted one to tier to drape over the next tier rather than line up perfectly.
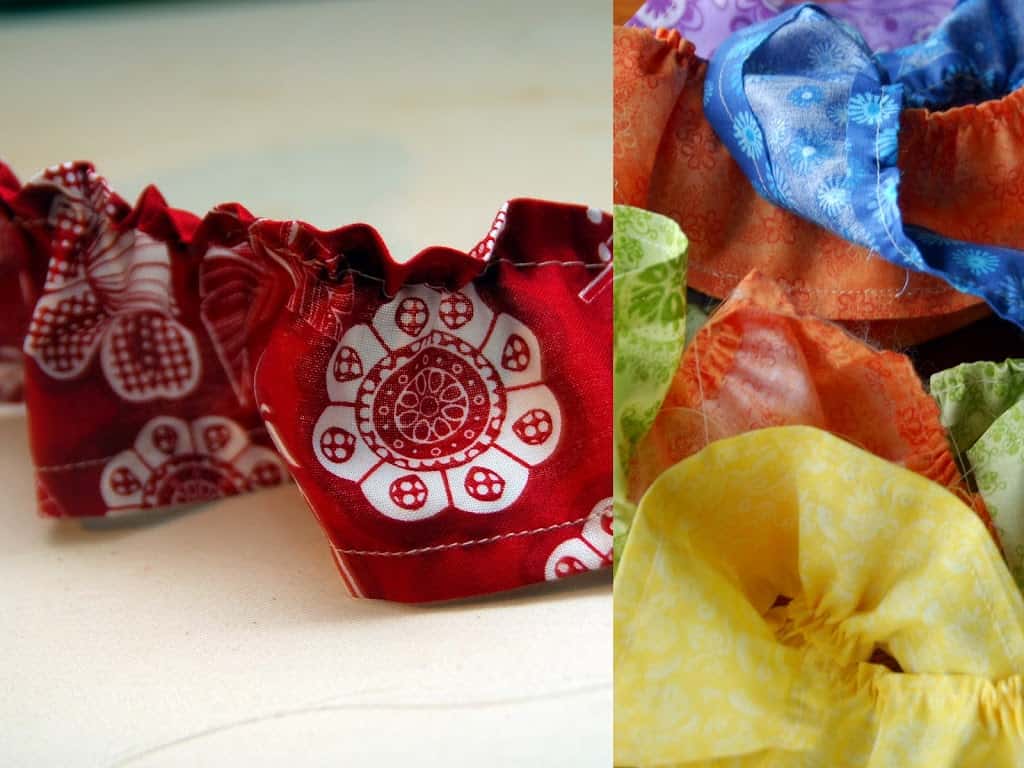
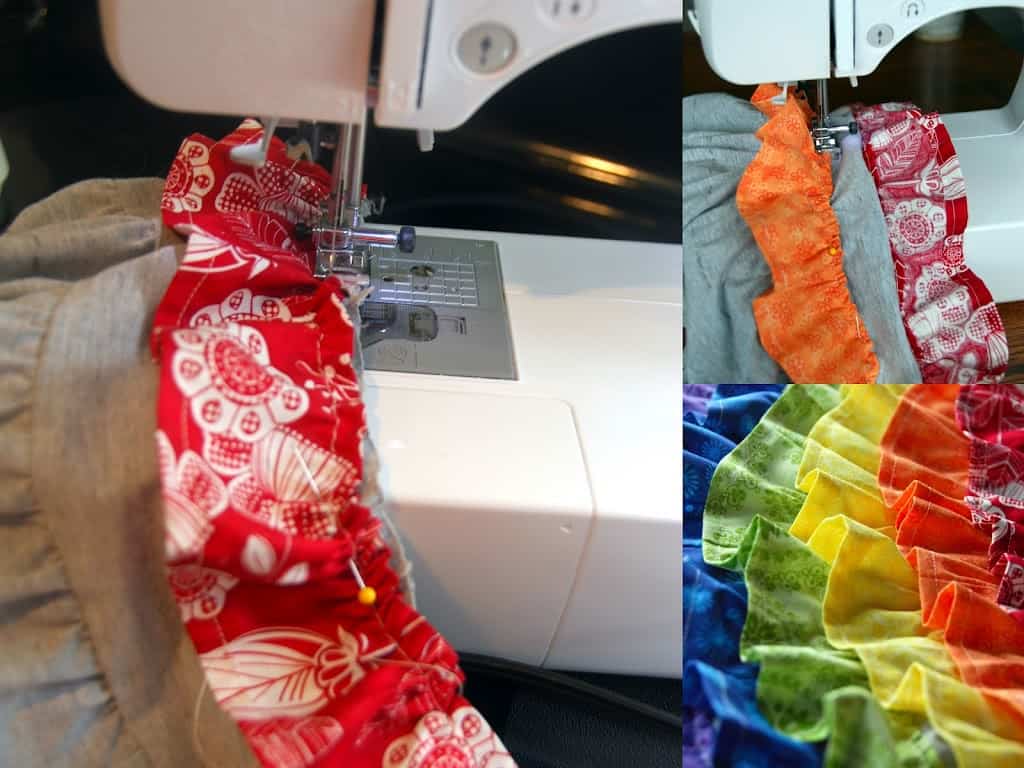
One by one, I pinned a layer in place, stretching out the top to the side and following the lines I had drawn on the under skirt. I then (back on 2.5 stitch length) sewed the tier to the skirt. I continued until all the layers were done. I’m starting to get pretty excited at this point because it was actually working.
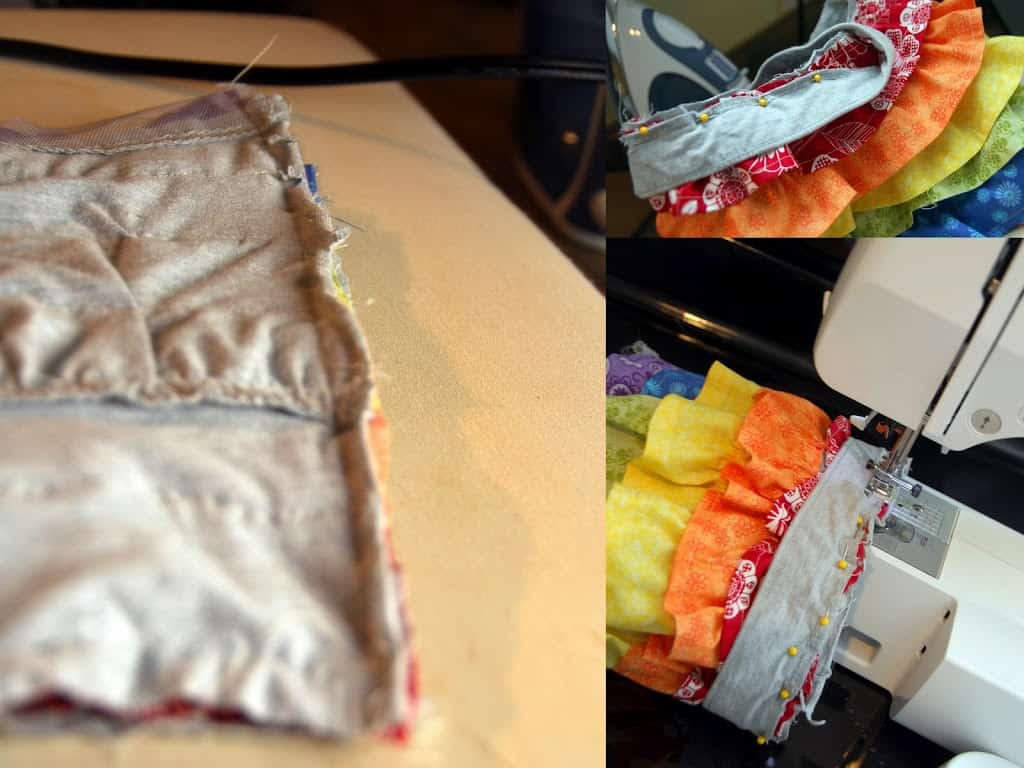 The final steps included folding the skirt in half (inside out) and sewing the seam together. I wish I had lined up my color strips a little more carefully. Then, I attached the top elastic waste band (that I took off the original skirt) with a lot of pins. I just wanted to make sure it was all lined up well on that break between the band and the red tier. I sewed it on and the skirt was done. So, there you have it. My first sewing tutorial. I probably fumbled through the tutorial as much as I fumbled through the project. I do hope it all made sense to anyone inspired to give it a go.


It turned out SO cute!! I don’t really sew either, so it sounded great to me!;)
Thanks, Angie. I guess it worked, so it must be a somewhat decent attempt. 🙂 My husband had fun with your family at the Daddy Daughter Dance.
Annika is still on cloud 9 from the dance, & she has worn her ‘ball gown’ almost every day since. 🙂 They had fun, too!
Excellent tutorial. What little girl wouldn’t love this skirt? Thank you for sharing it.
It makes her want to twirl. 🙂 Thanks for commenting.
I am a professional seamstress, you did a great job both on the skirt and on the tutorial! I began sewing as a little girl, have always loved to sew and create, love to see others learn this skill and use it!! Keep it up!
Isn’t great to have that confirmation from a pro?
Too cute!! I love it!
Thanks so much.
Thanks so much for showing us how. I will do this project. This will be the first tutorial that I actually follow.
Oh, that makes me really happy. My first sewing tutorial and someone is going to do it. I would love to see the results!
My daughter is having a rainbow b-day party this weekend! I wonder if I have time to make one of these before then? Thanks for the idea!
I hope you did. I can’t wait to see your results. We’re having so much fun with this theme.
The skirt is adorable. My kids would love it if I made them one. According to my oldest, rainbow is a colour!
I ask my oldest what her favorite color is, and she says, “All the colors of the rainbow.” I hope you’ll give it a go.
Very Cute! Looks like she loves it!
She does love it. Thanks so much for commenting.
Beautiful photography, fun craft and DARLING baby girl! I’m so happy you left me a note. I LOVE your blog! I’m your newest follower!
XO, Aimee
Thanks, Aimee. I just love your blog too. I’m glad we get to follow each other on this crazy journey.
Coming from someone who sews, you’ve written a great tutorial that’s easy to follow! The skirt is just gorgeous… so colourful and girlie!!! The rainbow colours and the ruffles caught my attention and ‘made’ me click over here. I would love for you to share this at our ongoing linky that’s just for Girls’ Skirts…
http://threadingmyway.blogspot.com/2012/02/threading-your-way-skirts-for-girls.html
I never imagined I would be invited to be part of a link party dedicated to sewing. Thanks for the invite. I just linked up. It’s been a busy week. Sorry it took so long.
Thanks for linking up. Looking forward to seeing more of your creativity…
Oh my much too adorable!!
Maysem @ odetoinspiration.wordpress.com
Thanks so much for checking it out!
That looks so lovely!
Thank you, Liz.
I really like this Jodi- the ruffles look so sweet. Great job on doing a project outside of your comfort zone (I am always fumbling through projects)! But it turned out excellent and your little one looks like she loves it!
Found you at Sugar Bee Crafts Linky!
Zoe
Thanks, Zoe. I also kinda like the things I fumble through. There’s a great feeling at the end…I actually did that? Crazy! Thanks for taking an interest.
Very cute, thanks for sharing. Your daughter looks like she loves her new skirt.
I’m saving it for her birthday, and she’s pretty excited about that.
I love this, it turned out so cute!
~Jamie
Thanks so much, Jamie. I appreciate the sweet words.
GREAT tutorial!
Thanks so much for sharing this at The DIY Dreamer… From Dream To Reality!
Thanks so much for hosting us!
Really really cute! And the skirt to! I love it!
You can see your daughter is loving the skirt!
Thank you for the tutorial!
Charlotte
She loves it and can’t wait to wear it for her birthday Saturday. Thanks for your comments.
Visiting from the Lil Luna party. I adore this skirt!! You did a great job with the fabric choices!!
sara @ applestonedrive.blogspot.com
Thanks so much for stopping by. Thank you, also, for all that you are doing at your site. My life feels too fully right now, and I’m needing to draw some boundaries, so I can’t commit to anything, but I’m following along. We have huge stuff going on at our church in the adoption realm. It’s so exciting to watch these kids find their families. Thanks for serving in this way!
Oh this is just gorgeous! My daughter would love this!
Visiting from the Trendy Treehouse linky x
I’m glad you found me. Thanks so much for taking the time to comment.
How cute and she looks adorable in it! I’d love to try this for my granddaughter!
Please let me know if you do. I would love to see the results.
Such a great idea to use an existing skirt! It looks brilliant!
Thanks so much. Since you’re from a great sewing site, I’ll take the compliment. I didn’t see it as brilliant in the moment. I just didn’t know how else to do it. 🙂